
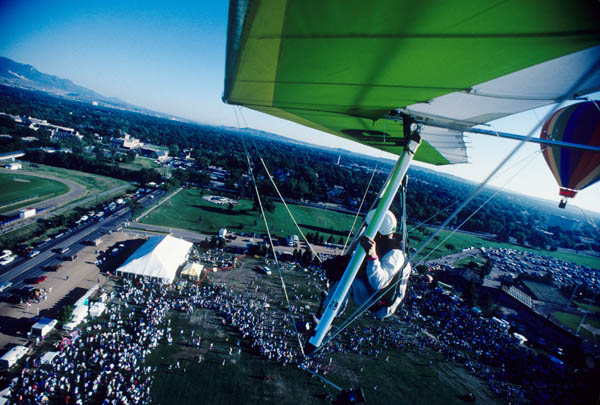
 photo by Jan Davis
SKY HOOK SLED RIDES
© John Heiney 1992
photo by Jan Davis
© John Heiney 1992
More pilots are doing hang gliding demonstrations at air
shows every year, and towing (both ground and aero) is the
popular method of getting gliders airborne. Today's towing
systems are safe and reliable, and are applicable in most air
show situations. But there is another way to put a hang glider
a few thousand feet above the ground at an air show, and it can
make for a more spectacular and colorful show. I am speaking
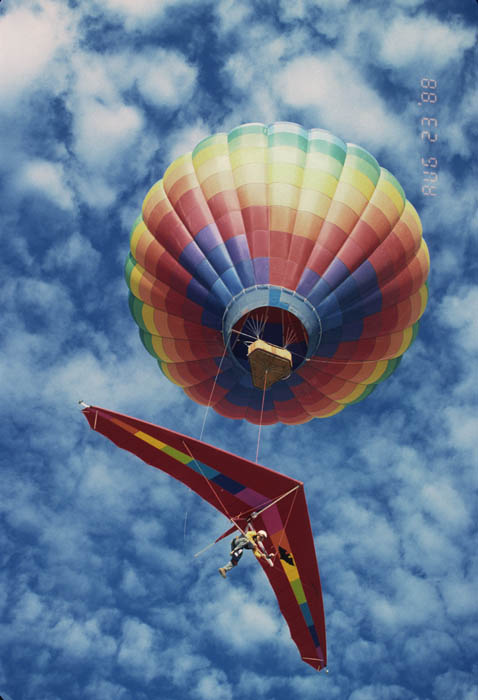
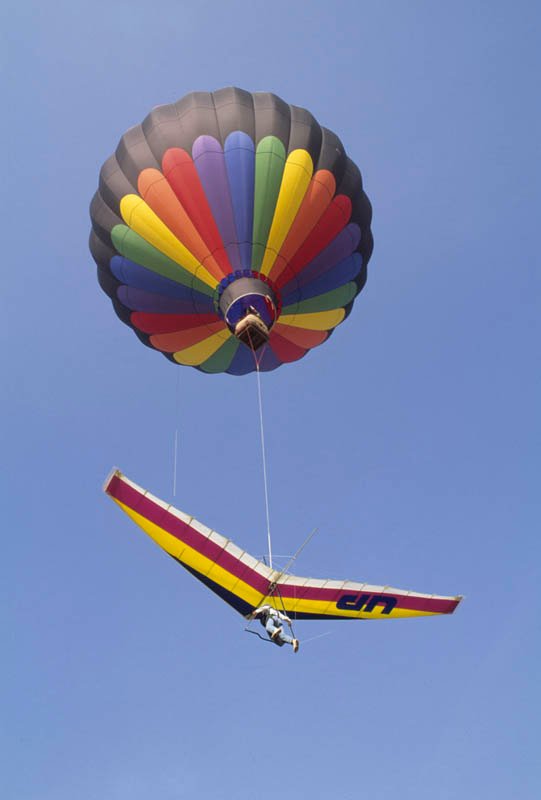
of course, of a hot air balloon launch or "balloon drop".
I did my first balloon drops for a segment of "The Spectacular World of Guinness Records" in which I did 52 loops after releasing from a balloon at 9000 feet AGL. When Bill Dobbs (of Southern California Balloons) and I went out to test my system we did two drops on one inflation of the balloon. After the first release I played around the balloon for awhile, then allowed Bill to choose a landing area. I landed near the balloon and reconnected for another practice run.
During the course of filming the segment I did several more drops. Tom Sanders (of Aerial Focus) did the airborne filming. He shot from a helicopter and had 16 MM cine and live transmission microwave video equipment to mount on the glider. One day Ken Crabtree (microwave/video expert) and I did three camera mounts on three successive flights in a very short time on one balloon inflation.
I mounted a camera on the glider and Bill took me up. I released and recorded loops while Bill landed and kept the balloon inflated. I landed next to the balloon. Ken and I quickly changed camera positions for the next flight. We repeated this process until we had done a wing, a front, and a rear mount. It was a great team effort.
A balloon drop is great fun and quite safe if you pay attention to a few serious inherent dangers. A significant advantage to balloon launching is that a balloon needs no runway. In fact, A hang glider can be lifted out of an area smaller than that required for landing, which would not be a wise thing to do. Always plan options. You never know for sure which way you will drift. You might need to release earlier or later than you had planned. Your landing zone must be clear before you lift off, in case of early release.
A considerable disadvantage is that a balloon/hang glider lift-off becomes dangerous in more that a few miles-per-hour surface wind. This one aspect of balloon operation makes them unusable in areas where the wind increases by late morning (when most air shows occur). I suspect that in most places on the planet the middle of the day is a bad time to be ballooning unless you are setting a transcontinental record and are up for all day.
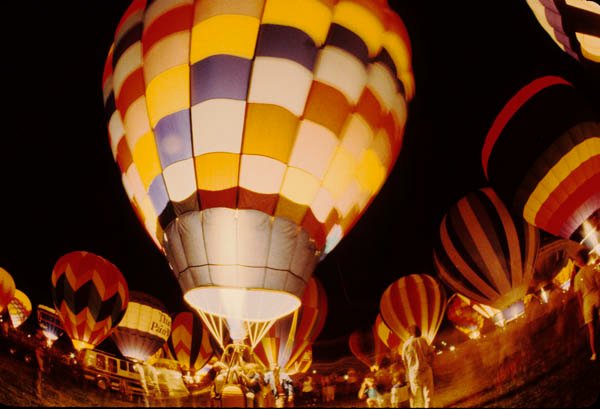
Because of the wind problem balloons will never replace towing in air show demos. However, there is one situation in which a balloon drop/hang gliding demo is a natural, and that is a hot air balloon festival. Hang glider pilot Tom Dermody realized this four years ago and organized my participation in the Colorado Springs Balloon Classic, one of my favorite events of the year. [I did demos at this event for eight consecutive years('89-'96]
These events are of course held at a good time of day for ballooning, early morning/late evening. The balloons are already there. There is always one balloon pilot who is bored and ready to try something new and interesting. All you have to do is convince him/her and the festival organizers that you know what you are doing. But that can be difficult if you have never done it before. I can give you some tips on equipment and technique, and some safety rules that will help if you are a good pilot and have an understanding of mechanics.
SAFETY RULES:
#1 DO NOT HAVE A PREMATURE DROP! ! !
This is the single most important/dangerous aspect of balloon launching. If you inadvertently release yourself, or the balloon pilot accidentally releases you, or your rope, release or attachment to the balloon breaks or comes loose 30 to 200 feet above the ground; YOU WILL DIE! ! ! It is for this reason that I do not like to have a quick release on the balloon. If the balloon pilot insists on an emergency release, set up a system by which he must cut your rope with a knife, so he cannot do it accidentally.
You must impress upon the balloon pilot that the time between when your feet leave the ground, and when you reach 500 feet AGL is a critical danger period for you. After a gentle lift-off, you must get to 500 to 1000 feet as quickly as possible. That way there is less time for something to go wrong during this high risk period. A balloon pilot might wish to stay low to utilize an air layer that is moving in the desired direction.
It is important to stow your release line in such a position that it is physically impossible to inadvertently pull it during ascent. I "S" stowe the line into a small bundle and tape it to the top of the downtube with a little slack between the bundle and the release. When I am at a safe altitude I reach up, remove the tape and let the line fall to the basetube.
#2 DO NOT ALLOW THE BALLOONIST TO DRAG YOU THROUGH TREES, POWER LINES, BUILDINGS OR PEOPLE!
This one seems obvious, but do not assume anything. THIS IS YOUR LIFE. Once you are dangling from the balloon your fate depends on how well you educated the balloon pilot to your needs. He is not accustomed to having something hanging forty feet below his basket. In a situation of unexpected increase in wind he might misjudge the clearing of an obstacle. This is another reason for getting to safe altitude quickly after a gentle lift-off. A gentle lift-off is important, because a balloon pilot once broke the keel by lifting off too fast before the rope went tight.
#3 ALWAYS HAVE A LANDING AREA CLEARED BEFORE YOU LIFT OFF.
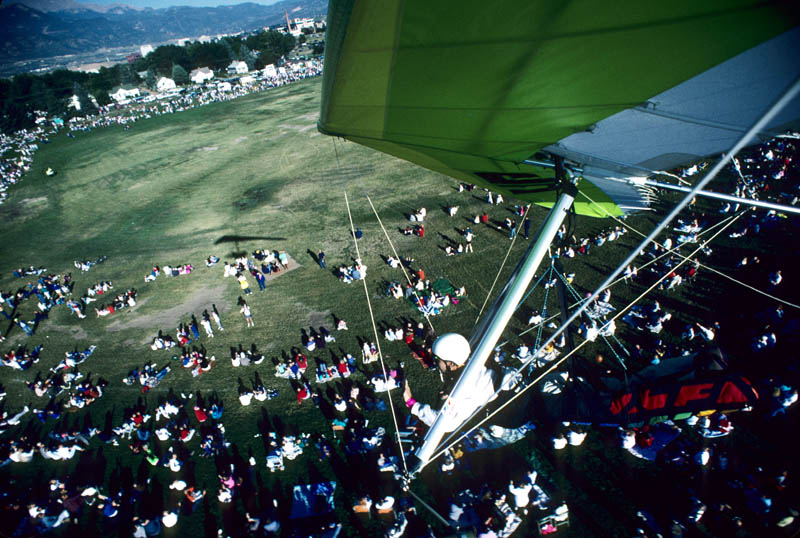
If something goes wrong, you might need to land back where you started right away. Generally, at a balloon festival you will be lifting off in the balloon inflation area, in the middle of a large crowd of people. As you lift off, the natural tendency of the crowd is to flow in and fill your LZ! You must have aggressive crowd control people who will clear your LZ before you lift off and keep it clear until you land. This should be a job for the event organizers, but it is your responsibility to make them understand your safety needs, which cannot be compromised. Remember that there will be little or no wind at a balloon festival. It might be light and variable. It could switch tail as your are about to flare. Your zero wind landing technique should be excellent. If it is not, work on it before you fly in a show. You are there to show people what you know how to do, not what you don't know how to do.
#4 DO NOT CHOOSE A WILD-MAN AS YOUR BALLOON PILOT.
Balloonists do not carry reserve parachutes, so they usually conduct their flight activities conservatively. But there are crazy people in all sports. Someone else might pick a balloon guy for you, but you have the final decision as to whether this person understands your requirements and takes them seriously.
EQUIPMENT:
THE BALLOON- A balloon that can carry two passengers can lift a hang glider. A hang glider/pilot combination is usually less than 300 pounds, about the weight of two light balloon passengers. Tell the balloonist the weight of yourself, your harness and your glider.
Any type of balloon basket will work. When attaching the lifting rope keep two things in mind: The attachment must have no chance of damaging any part of the balloon or basket. The attachment must not come loose. Confer with the balloonist and decide on a system that makes you both comfortable. Some baskets have a floor designed with radial frame members that meet at the center between two horizontal plates.
These plates have a vertical hole through the center of about 1/2 inch diameter. I put a short 1/2 inch forged-type "eye" bolt through from the bottom with an 1/8 inch 6061-T6 aluminum plate about 10 inches in diameter (effectively a large flat washer) on top to spread the load. I use a wing nut which doubles as the balloon pilot's "release" for jettisoning the rope in an emergency.
Do not have a long "eye" bolt sticking out the bottom of the basket. Side loads during landing could damage the basket. Normally the rope stays attached to the basket throughout the flight. I fasten a small line to the lifting rope several feet below the basket so the balloon pilot can haul the rope up and store it in the basket during his descent. The rope is a hazard of course because it could snag on power lines or other obstacles on the landing approach.
 Jeff Dunn and Art Pryor
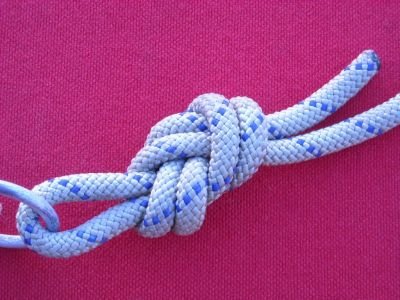
You can attach each end of a rope to two of the points where the basket is connected to the envelope. You should find carabiners there. Allow this rope to droop under the basket, and attach your lifting rope to it using a steel ring or carabiner. Use "figure-8" knots. The figure-8 is the knot climbers trust as secure.
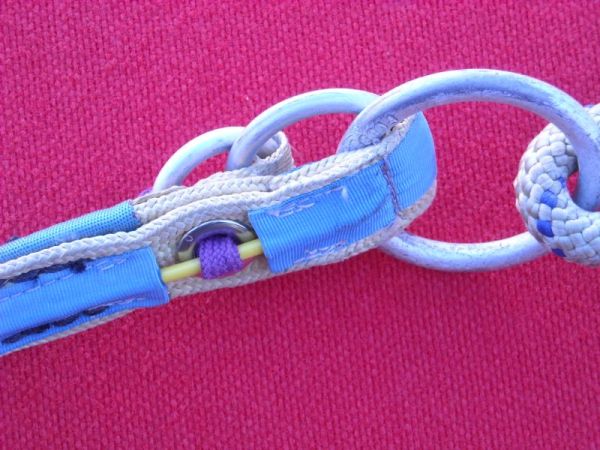
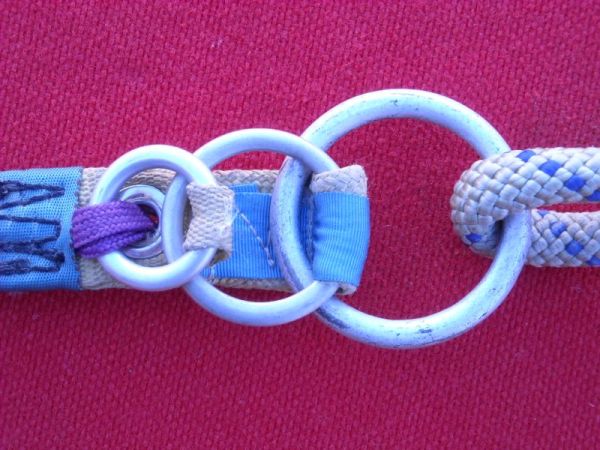
THE RELEASE- I believe that the "3-ring" release, similar to that used in towing, is best. This device was invented for sky diving canopy cut-away. The balloon release must be much stronger than that required for towing. I like a 10-X safety factor. If you build your own use at least 2000 pound nylon webbing with strong nylon thread and forged steel rings. Never use welded rings. Be sure to understand 3-ring theory before you build.
Design the release pin so a long pull is required to help prevent unintentional release. You can order a proper balloon release from me.
THE SYSTEM- Before I did my first drop I researched what others had done in the past and developed my own system using their best features, and some ideas of my own. It is very simple and requires no modification to the glider whatsoever. The 3-ring release is attached to the keel by "lark's head" just behind the king post, in the same way you would install a hang loop. The release protrudes upward through the king post's hole in the sail. A keel pocket glider might need a longer release to account for the extra distance between the keel and the sail.[I have not done a drop with a topless glider. A special lifting point would have to be worked out].
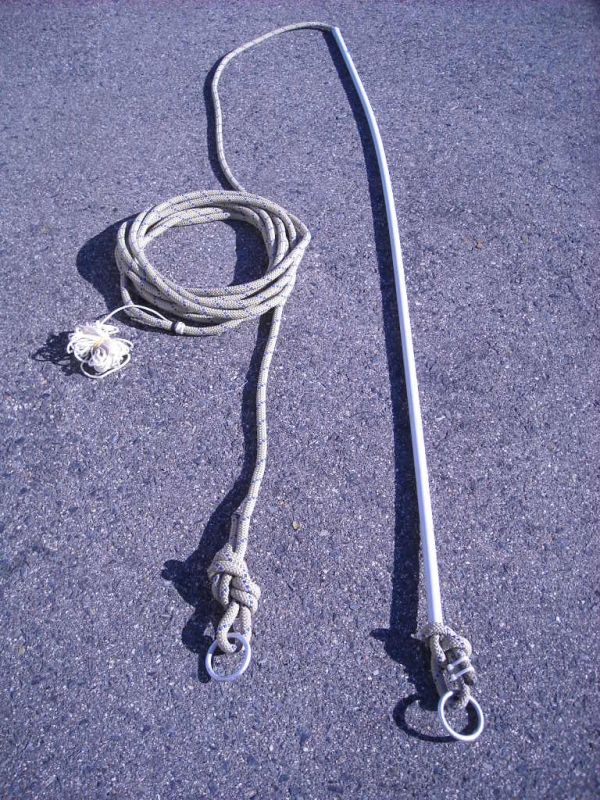
A 1/2 inch or 10 mm kern-mantle type climbing rope about 30 feet long is attached to the free ring of the release by a figure "8" knot. The bottom several feet of the lifting rope is made rigid by sliding a piece of rigid plastic pipe over the rope before tying on the ring. This prevents the rope from wrapping around and snagging the upper rigging of the glider at the moment of release.
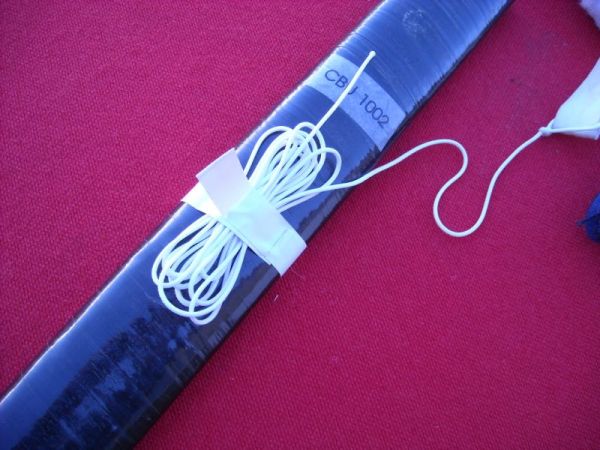
A small line (205 cord) extends from the release pin to the base tube (remember to stow it at the top of the downtube with tape). I pull the release with my teeth so I can keep both hands on the base tube.
On most gliders the release position (rear part of the king post's hole in the sail) is somewhat behind the hang point. This means the nose will want to pitch down. As you lift off you will notice the base tube is against your legs. You will need to hold the control bar forward with your hands or by putting your feet on the base tube (a more comfortable way to ascend). Do not allow the control bar to move behind you or the glider will pitch nearly vertical with you against the bottom surface near the nose.
You can hang your glider from a tree to see how it will feel. There is no reason to do a practice release from a tree. You might hurt yourself or damage your glider. If the hang point on your glider is rearward of the release position, the glider will tend to pitch up. You will need to hold the control bar "in" as you ascend. In either case at the moment of release the control bar MUST be held in a dive position (about at your stomach). It is important to the balloon pilot that he be in a 300-500 feet per minute descent before you release. Do not release without his "OK". He will snap up like a stone in a sling shot if the balloon is too buoyant at the time of release.
LAUNCH PROCEDURE:
Assemble your glider with release in place and lifting rope ready before the balloon crew lays out the envelope. Position the glider up wind of the basket, and attach the lifting rope to the basket. Start "cold inflation" of the balloon. Connect the lifting rope to the release on the glider, and be sure it is in a functioning configuration. Bundle the release line and tape it to the top of the downtube. Be sure it will not pull the pin as the lifting rope tightens (leave some slack).
The hang glider pilot needs at least one helper to hold the lifting rope tight against the release, and to prevent it from snagging a wing tip or wrapping around the keel as the balloon leaves the ground. Your helper should also direct you as you walk backwards to get directly under the balloon for lift-off.
The balloon pilot must have prior instruction to lift you off gently. As the balloon leaves the ground, you back your glider under the balloon as per your helper's directions. You cannot see the balloon from under your glider. At this point you are hooked in, hang checked and ready to fly. The last thing you do before you hook in is inspect the release. From this point on, your helper holds the lifting rope, and does not let go until it is taken out of his hands.
As the lifting rope tightens you will lift off, settle back to Earth, then finally lift off. It is best to just hang motionless during this critical time until you reach 500 to 1000 feet. Then you can adjust your position as you wish. When the balloon's burners are off you can communicate by yelling. Radios are an obvious option. As you approach the agreed upon release altitude, remove the tape from the release line and assume your normal flying position. You will need to hold forward pressure on the control bar until release (unless your hang point is behind the release position, in which case you will need to hold "in").
Sometimes the balloon will continue to ascend an unusually long time after the last "burn". If you hit an upper level wind you might need to go much higher than expected just to make it back to the LZ. A good balloon pilot will look for another wind direction that will bring you back closer to show center.
Once the balloon pilot starts his descent it will take 500 feet or more to reach a comfortable descent rate. The descent is of no help to the hang glider, but is necessary for the safety of the balloonist. Some pilots imagine that the descent will some how give the glider airspeed and start it flying. This is total nonsense. The launch will be just like stepping off a shear cliff in no wind.
When the balloon pilot gives you the "OK", raise your head slightly, put the release line in your teeth, move the control bar to a good dive position (about your stomach) as you pull the front of your body down. Your release will be abrupt and thrilling as you go from zero airspeed to a major dive. The nose will rotate downward to a fast dive position. DO NOT RESIST THIS PITCHING DOWN OF THE GLIDER. IF YOU PUSH OUT AT THIS POINT, YOU WILL LIKELY TUMBLE.
You will feel weightless for a bit so hold yourself to the base tube. Hold the dive position until you feel moderate positive bar pressure then let the bar out slowly. There will be strong nose-up bar-pressure.
After release, it is possible for the balloon to descend fast enough to arrive at your level. Keep track of him and all other aircraft that might be flying at the time.
The balloon people I know say that no government involvement is needed to launch a hang glider from a balloon. However, if you fly in an air show a waiver might be necessary. The event organizers should take care of that. It seems best to me not to involve any agencies in our activities unless it is obviously necessary. Do your "fun" drops and practice drops in a remote area where you will risk no one's safety but your own.
When in doubt about strength of materials, go heavier. If you do not understand the physics of the situation, seek advice.
If you do fly in an air show, be professional, do a good
safe show and have fun. Above all remember you must never
jepordize the safety of the spectators.
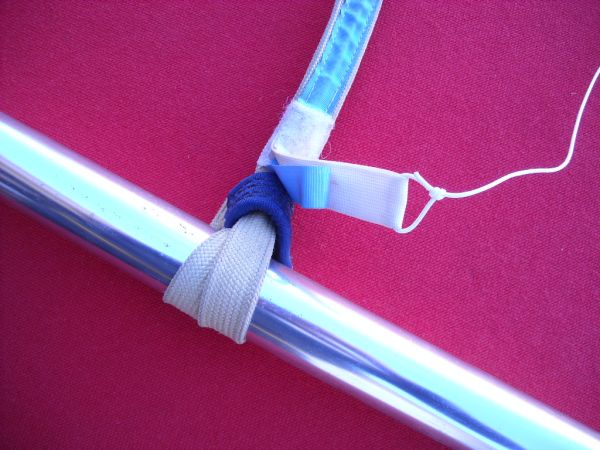 |
The release attached to the keel by lark's head. The release sticks up through the kingpost hole behind the kingpost. | 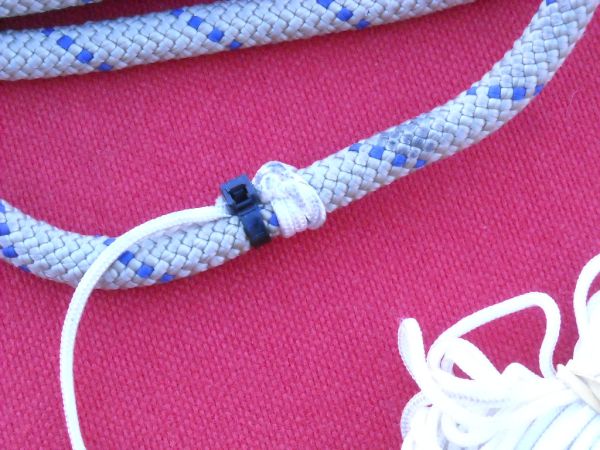 |
Lifting rope retreval line attachment. Use a secure knot and a zip-tie. Attach several feet below the basket. |
 |
The pin is a length of vinyl-coated cable that slides inside a sheath. | 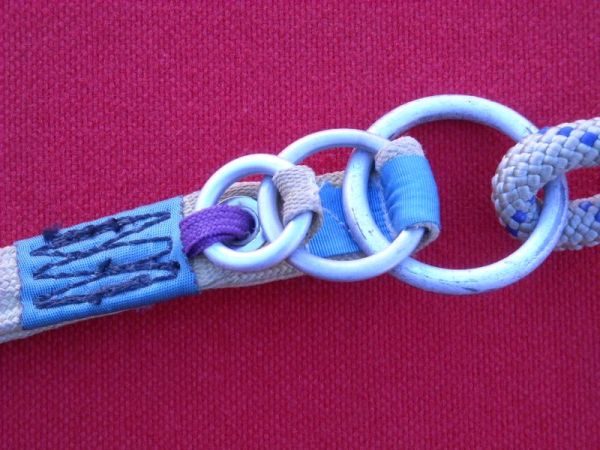 |
|
 |
Use vinyl elctrical tape and put a long "grip tab" on it so you can easily find it and rip it off. Rig it so the tape releases the line in one easy motion. | 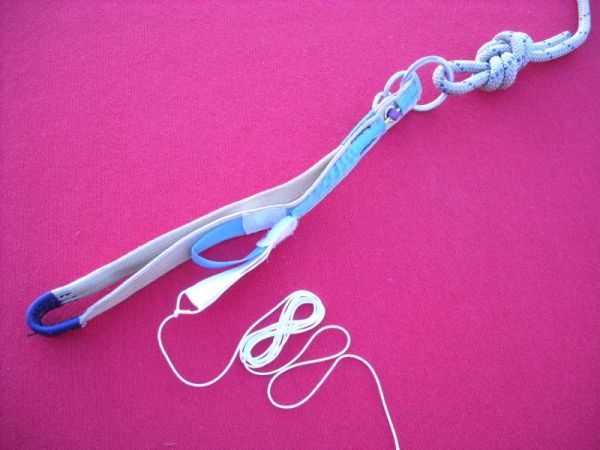 |
The pin is held in position by velcro to help prevent inadvertent release. |
 |
 |
| If you make your own release, the rings must lie on each other as in these pictures in order for it to work properly. I have always used a bowline knot on the bottom end of the lifting rope, because I feel it is smaller and less likely to snag on wires as is passes the upper rigging. The bowline is not considered a secure knot, but I use two zip-ties to secure it and it seems to work. If you use a bowline in a critical position, keep an eye on it. |
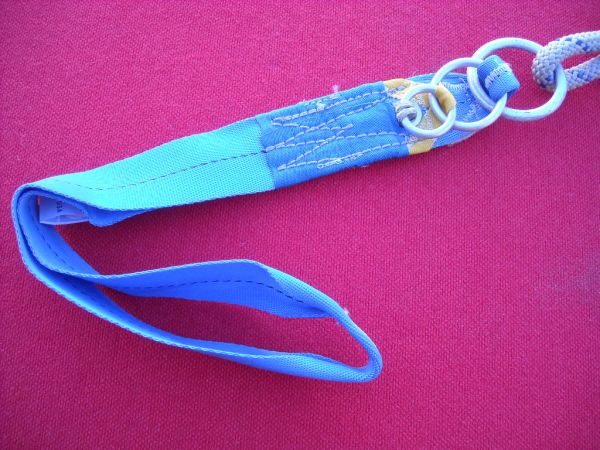 |
Here is a release made of 2 inch seatbelt webbing. | 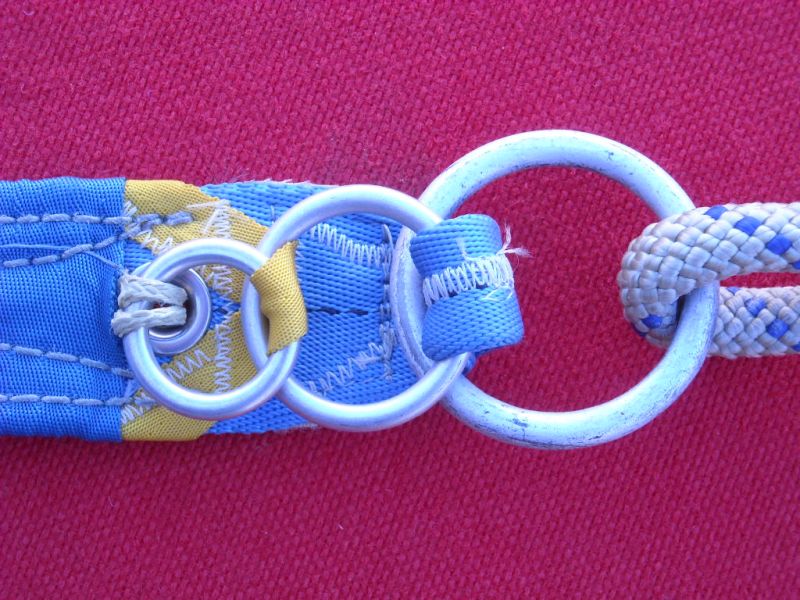 |
The pin is held in position by velcro to help prevent inadvertent release. |